Corda
After testing the Weaver interoperation mechanisms on basic sample networks, you may be interested in finding out how you can equip an existing real network, whether in development or in production, to exercise these mechanisms. In this document, we will demonstrate how to equip a Corda network and application with Weaver components and capabilities.
Model
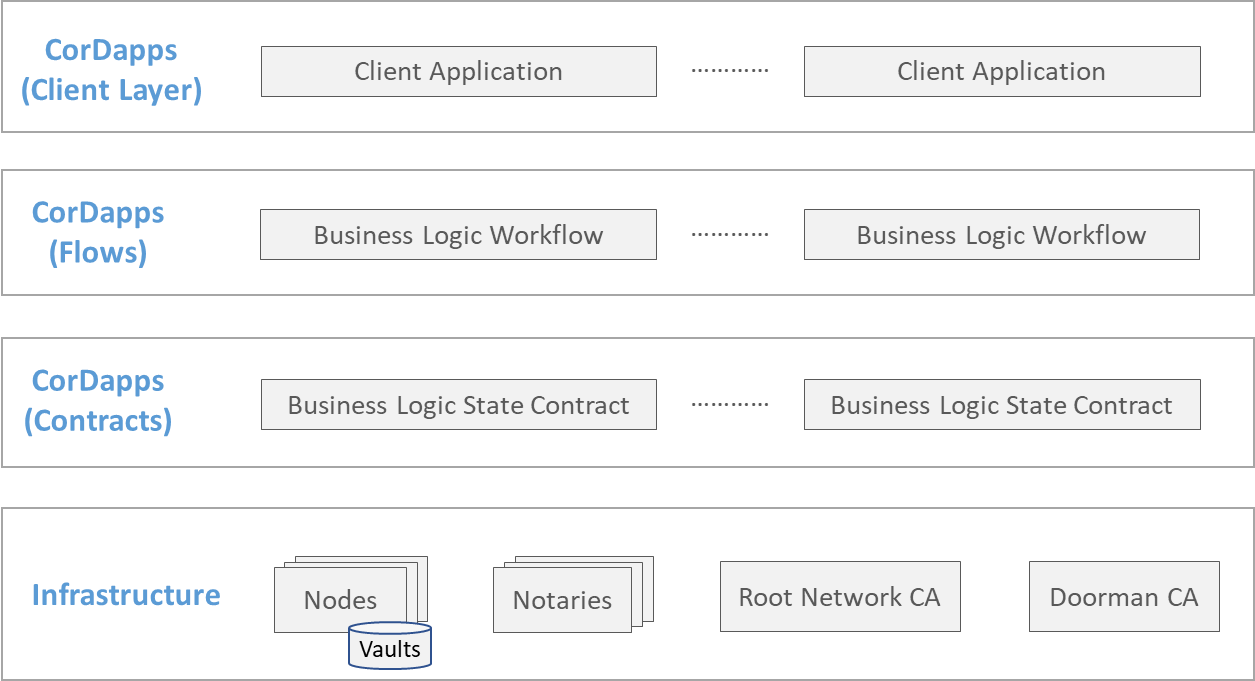
The figure below illustrates a typical Corda network. The infrastructure consists of a set of nodes (each maintaining its share of the global state in a local vault), notaries, and CAs. On the nodes are installed one or more CorDapps, representing shared business logic across subsets of those nodes. The core of a CorDapp consists of a collection of workflows (or flows) and contracts acting on states; we layer the flows above the contracts in thebelow image just to illustrate that flows represent transaction (state update) triggers, and contract validations occur during the executions of flows. Further up in the stack lie client applications associated with CorDapps that can are used to trigger flows (and by implication, contracts).
Such a network equipped with Weaver components and capabilities will look like the figure below. Legacy components are marked in grey and Weaver and bridging components in green.
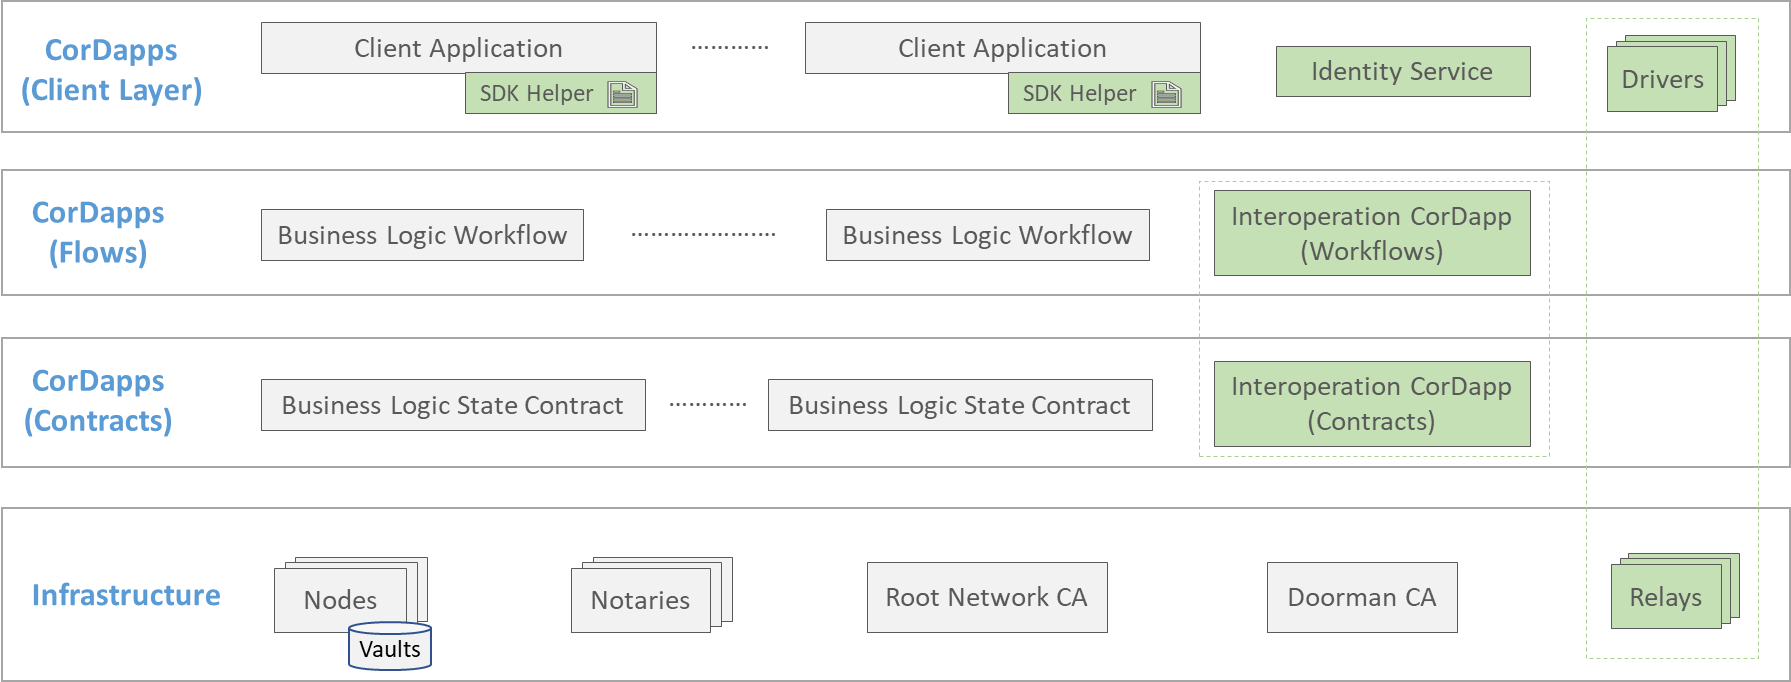
The relay and driver are the only additional infrastructure that need to be installed. One or more relays can be installed, as can one or more drivers. The drivers are illustrated in the client layer rather than in the bottom layer because, though they are coupled with relays, they trigger flows just like any client application does.
Existing CorDapp flows and contracts deployed on the network's nodes remain undisturbed. All that is required is the deployment of an Interoperation CorDapp (flows and contracts) on every node that needs to offer or consume state from foreign networks.
Client applications will need some additional code and configuration because the decisions to exercise interoperation mechanisms (relay queries for data sharing or atomic asset exchanges) are strictly part of business logic. But Weaver's Corda Interoperation Node SDK offers various helper functions to ease this process and keep the adaptation to a minimum, as we wil see later in this document. Finally, an identity service must be offered by the network to expose its CAs' certificate chains to foreign networks, thereby laying the basis for interoperation. This service simply needs to offer a REST endpoint, and can be implemented as a standalone application or (more conveniently) as an augmentation of one or more of the existing client layer applications.
Procedural Overview
A Corda network is typically created in phases, in the following sequence:
- Development: This involves writing CorDapp which consists of contracts and workflows, and client layer applications. The cordapp's deployment name/ID and its transaction API must be designed first, but subsequent development of the two layers of applications can then proceed parallelly.
- Pre-Configuration: This involves creating a desired specification (as a set of configuration diles) of the network topology and the ledgers it maintains.
- Startup and Bootstrap: This is the launch phase, in which the network components and applications are started and bootstrapped (i.e., configured with initial state and operating rules).
Assuming that the reader is familiar with this procedure, we will walk through the changes required in each phase to make your network ready for interoperation using Weaver components and code templates. This will involve code addition and adaptation, deployment of additional modules, additional configuration, and creation of additional ledger state records. The requirements and effort will vary with the mode of interoperation you wish to support in your Fabric network.
Development Phase
A Corda distributed application's business logic code spans three layers as illustrated in the network model:
CorDapp
CorDapps (Corda Distributed Applications) are distributed applications that run on the Corda platform. The goal of a CorDapp is to allow nodes to reach agreement on updates to the ledger. They achieve this goal by defining flows that Corda node owners can invoke over RPC.
For Data Sharing
No code changes are required for Weaver enablement, because data sharing involves:
- View packaging (and optionally, encryption) logic and access control logic in a source network, and
- View validation logic in a destination network
This logic is standard and independent of contract, workflow, and state, particulars. It is already implemented in the Interoperation CorDapp offered by Weaver. Hence you just need to deploy that CorDapp to exercise data sharing from, or to, your application CorDapp. Your application CorDapp can be oblivious of the Interoperation CorDapp's workings and of the view request-response protocol.
For Asset Exchange
To exchange an asset using Weaver, the asset's state on the ledger must be controlled in the following ways:
- Locked in favor of a party
- Claimed by the party to whom the asset is pledged
- Returned to the original owner if it is not claimed within a given timeframe
In addition, the state of the asset (i.e., whether it is locked), and its current and targeted owners, must be determinable by looking at the ledger records.
The bookkeeping logic required to maintain records of locks can be abstracted away from the particulars of a digital asset and its workflow. But as such assets and their properties (including ownership) can be, and are, encoded in an arbitrary number of ways, we cannot provide a one-size-fits all set of functions (like in the data sharing protocol) to exchange any kind of asset. Instead, we must rely on the application CorDapp managing an asset, as it knows precisely what the asset's properties are and how they can be updated and queried on the ledger.
What Weaver offers, therefore, is the following:
- Lock management logic implemented in the Interoperation CorDapp that treats each asset as an abstract object (an instance of generic corda's
ContractState) and is agnostic of the assets' internals. It consumes (burns) the asset state and creates a newHTLCstate that indicates that the asset is locked, while in claim and unlock new asset state is created (minted) with appropriate owner while consumingHTLCstate. This logic can be exercised in by installing Interoperation CorDapp on the nodes. - A set of template functions with sample (and extensible) code that must be added to the application CorDapp to augment the above lock management functions.
Below, we list the template functions with sample code that you, as a developer, must use and adapt within your CorDapp.
- Flow to get Asset State: For non-fungible assets, create a flow like:And for fungible assets, create a flow like:
class RetrieveStateAndRef(
    val type: String,
    val id: String
): FlowLogic<StateAndRef<AssetState>>The name of these flows can be anything, but the parameters should be same, and return type shouldclass RetrieveStateAndRef(
val type: String,
val quantity: Long
): FlowLogic<StateAndRef<AssetState>>StateAndRef. These flows are supposed to get theStateAndRefobject to the asset state that has to be locked, which can be identified bytypeandidfor non-fungible assets, andtypeandquantityfor fungible assets. - Flow to update owner in asset state: Create a flow like:Again the name can be anything but the function parameter should be same, i.e. take a
class UpdateOwnerFromPointer(
  val statePointer: StaticPointer<AssetState>
) : FlowLogic<AssetState>()StaticPointerand return theContractStateof the asset involved in asset exchange. This flow is supposed to resolve theStaticPointerto actual asset, and update the owner of this asset to the caller of this flow.
For Asset Transfer
TBD
Contracts CorDapp
No code changes are required for Weaver enablement. For asset exchange, Weaver assumes that application CorDapp that manages assets must already have a asset creation (mint) contract command and asset deletion (burn) contract command, which can be invoked when Issuer party is involved in the transaction.
Client Layer applications
Weaver provides an SDK to help you adapt your applications to exercise the various interoperability modes. These are called out as SDK Helpers in the network model illustrated earlier. Your Corda network's Client layer applications have business logic embedded in them that, broadly speaking, accept data from users and other external agents and invoke workflows from CorDapp over RPC. When you use Weaver for network interoperability, other options can be added, namely requesting and accepting data from foreign networks, and triggering locks and claims for atomic exchanges spanning two networks. Weaver's Corda Interoperation SDK offers a library to exercise these options. But this will involve modification to the application's business logic.
To use Weaver's Corda SDK, you need to create a personal access token with read:packages access in Github, to access weaver packages.
You also need to add the following to your application's build.gradle file:
repositories {
  maven {
      url https://maven.pkg.github.com/hyperledger-labs/weaver-dlt-interoperability
      credentials {
          username <github-email>
          password <github-personal-access-token>
      }
  }
}
dependencies {
  implementation(group: 'com.weaver.corda.sdk', name: 'weaver-corda-sdk', version: "1.2.13")
  implementation(group: 'com.weaver.corda.app.interop', name: 'interop-contracts', version: "1.2.13")
  implementation(group: 'com.weaver.corda.app.interop', name: 'interop-workflows', version: "1.2.13")
  implementation(group: 'com.weaver', name: 'protos-java-kt', version: "1.5.7")
}
(Or check out the package website and select a different version.)
For Identity Administration
A Corda network needs to share its security domain (or membership) configuration, i.e., its nodes' CA certificate chains, with a foreign network with which it seeks to interoperate. Though such sharing can be implemented using several different mechanisms, ranging from manual to automated, the simplest and most modular way is to expose a REST endpoint that agents in foreign networks can reach. Further, this REST endpoint can be implemented as a standalone web application or it can be an extension of one or more of the existing client layer applications. (Multiple apps can expose the same endpoint serving the same information for redundancy.) We will demonstrate an example of this while leaving other implementation modes to the user.
Let's say a Corda network consists of two nodes called PartyA and PartyB, each running a client layer application with a web server whose URL prefixes are http://partya.mynetwork.com:9000 and http://partyb.mynetwork.com:9000 respectively. Each app then can expose a REST endpoint (again, as an example) http://partya.mynetwork.com:9000/node_sec_grp and http://partyb.mynetwork.com:9000/node_sec_grp respectively.
At each web server's backend, you need to implement logic to retrieve the node's ID and it's associated certificated chains. Sample code is given below for a Kotlin implementation built on weaver-corda-sdk. You can use this code verbatim, except for some minor changes like <path-to-root-corda-net-folder>, other parameters like security domain, and list of names of nodes as appropriate for your environment:
import com.weaver.corda.sdk.CredentialsCreator
import com.google.protobuf.util.JsonFormat


@RestController
@CrossOrigin
@RequestMapping("/") // The paths for HTTP requests are relative to this base path.
class Controller {
    // Expose "node_sec_grp" endpoint using Rest Controller
    @RequestMapping(value = ["/node_sec_grp"], method = arrayOf(RequestMethod.GET), produces = arrayOf("application/json"))
    private fun GetNetworkConfig(): String {
        val jsonPrinter = JsonFormat.printer().includingDefaultValueFields()

        val credentialsCreator = CredentialsCreator(
            "<path-to-root-corda-net-folder>/build/nodes",
            "mynetwork", // security domain name
            ["PartyA", "PartyB"], // list of nodes
            "",
            ""
        )

        // Generate Membership
        val membership = credentialsCreator.createMembership()
        return jsonPrinter.print(membership)
    }
}
An agent from a foreign network can query either http://partya.mynetwork.com:9000/sec_group or http://partyb.mynetwork.com:9000/sec_group and obtain the security domain (or membership) configuration of the entire network.
For Data Sharing
Consider a scenario inspired by the global trade use case where a letter of credit (L/C) management business logic is installed in the trade-finance-network network, supports a flow named UploadBillOfLading, which validates and records a bill of lading (B/L) supplied by a user via a UI. Weaver will enable such a B/L to be fetched from a different network trade-logistics-network by querying the function GetBillOfLading exposed by the chaincode shipmentcc installed in the tradelogisticschannel channel (The trade logistics network can be built on Corda as well. The steps for Weaver-enablement will mostly be the same, with the exception of view address creation logic. Here, for demonstration purposes, we assume that that counter-party network is built on Fabric).
(In preparation, a suitable access control policy must be recorded on tradelogisticschannel in trade-logistics-network, and a suitable verification policy must be recorded in the vault of trade-finance-network. We will see how to do this in the Startup and Bootstrap Weaver Components section later.)
You will need to insert some code in the client layer application that accepts a B/L and submits a UploadBillOfLading request in trade-finance-network. (No code changes need to be made in any application in the other network.) The logic to accept a B/L should be replaced (or you can simply add an alternative) by a call to the InteroperableHelper.interopFlow function offered by the weaver-corda-sdk library. The following code sample illustrates this:
import com.weaver.corda.sdk.InteroperableHelper
import com.mynetwork.flow.UploadBillOfLading

val viewAddress = InteroperableHelper.createFabricViewAddress(
  'trade-logistics-network',               // Security Domain/Group
  <trade-logistics-relay-url[:<port>],     // Replace with remote network's relay
  'tradelogisticschannel',                 // Remote network's channel
  'shipmentcc',                            // Remote network's cc
  'GetBillOfLading',                       // Remote network's cc Fun
  [ <shipment-reference> ]                 // Replace <shipment-reference> with a value that can be used to look up the right B/L
)
try {
  val response = InteroperableHelper.interopFlow(
      proxy,                                // CordaRPCOps instance to start flows
      viewAddress,
      <trade-finance-relay-url>[:<port>]   // Replace with local network's relay address and port
  ).fold({
      println("Error in Interop Flow: ${it.message}")
  }, {
      val linearId = it.toString()
      val BoLString = InteroperableHelper.getExternalStatePayloadString(
          proxy,
          linearId
      )
      val result = proxy.startFlow(::UploadBillOfLading, BoLString)
      println("$result")
  }
} catch (e: Exception) {
  println("Error: ${e.toString()}")
}
Let us understand this code snippet better. The function UploadBillOfLading expects one argument, the bill of lading contents. The InteroperableHelper.createFabricViewAddress is used to create view address that is to passed to InteroperableHelper.interopFlow function. The equivalent function to create a view address for a remote Corda network is InteroperableHelper.createCordaViewAddress.
The rest of the code ought to be self-explanatory. Values are hardcoded for explanation purposes.
Enabling TLS:
By default, the TLS is set to false in interopFlow, i.e. disabled. But if you want to enable TLS, can pass additional parameters to the interopFlow function as follows:
val response = InteroperableHelper.interopFlow(
    proxy,                                // CordaRPCOps instance to start flows
    viewAddress,
    <trade-finance-relay-url>[:<port>],   // Replace with local network's relay address and port
    'trade-finance-network',              // Local network name (destination)
    true,                                 // Boolean indication TLS is enabled.
    <relayTlsTrustStorePath>              // JKS file path containing relay server TLS CA certificates
    <relayTlsTrustStorePassword>,         // password used to create the JKS file
)
OR
val response = InteroperableHelper.interopFlow(
    proxy,                                // CordaRPCOps instance to start flows
    viewAddress,
    <trade-finance-relay-url>[:<port>],   // Replace with local network's relay address and port
    'trade-finance-network',              // Local network name (destination)
    true,                                 // Boolean indication TLS is enabled.
    <tlsCACertPathsForRelay>,             // colon-separated list of CA certificate file paths
)
For Asset exchange
Let's take an example of asset exchange between Alice and Bob, where Bob wants to purchase an asset of type Gold with id A123 from Alice in BondNetwork in exchange for 200 tokens of type CBDC01 in TokenNetwork.
Alice needs to select a secret text (say s), and hash it (say H) using say SHA512, which will be used to lock her asset in BondNetwork. To lock the non-fungible asset using hash H and timeout duration of 10 minutes, you need to add following code snippet in your application:
import com.weaver.corda.sdk.AssetManager
import com.weaver.corda.sdk.HashFunctions

var hash: HashFunctions.Hash = HashFunctions.SHA512
hash.setSerializedHashBase64(H)
val proxy = <CordaRPCOps-instance-created-using-credentials-of-Alice-in-BondNetwork>
val issuer = <Issuer-party-in-BondNetwork>
val recipient = <Bob-party-in-BondNetwork>
val contractId = AssetManager.createHTLC(
  proxy,
  "Gold",         // Type
  "A123",         // ID
  recipient,
  hash,
  10L,            // Duration tmeout in secs, L denotes Long
  1,              // 1 if timeout is Duration, 0 if timeout is in absolute epochs
  "com.cordaSimpleApplication.flow.RetrieveStateAndRef", // full name of "Flow to get Asset State"
  AssetContract.Commands.Delete(),  // Contract command for Asset to Burn/Delete the state
  issuer,
  observers       // Optional parameter for list of observers for this transaction
)
Now Bob will lock his tokens in TokenNetwork. To lock the fungible asset using same hash H and timeout of 5 minutes (half the timeout duration used by Alice in BondNetwork), add following code snippet in your application:
import com.weaver.corda.sdk.AssetManager
import com.weaver.corda.sdk.HashFunctions

var hash: HashFunctions.Hash = HashFunctions.SHA512
hash.setSerializedHashBase64(H)
val proxy = <CordaRPCOps-instance-created-using-credentials-of-Bob-in-TokenNetwork>
val issuer = <Issuer-party-in-TokenNetwork>
val recipient = <Alice-party-in-TokenNetwork>
val contractId = AssetManager.createFungibleHTLC(
  proxy,
  "CBDC01",       // Type
  "200",          // Quantity
  recipient,
  hash,
  5L,             // Duration timeout in secs, L denotes Long
  1,              // 1 if timeout is Duration, 0 if timeout is in absolute epochs
  "com.cordaSimpleApplication.flow.RetrieveStateAndRef", // full name of "Flow to get Asset State"
  AssetContract.Commands.Delete(),  // Contract command for Asset to Burn/Delete the state
  issuer,
  observers       // Optional parameter for list of observers for this transaction
)
The above locks will return contractId, that has to be stored and will be used in other HTLC functions.
To query whether the assets are locked or not in any network, use following query function:
val isLockedBoolean = AssetManager.isAssetLockedInHTLC(
  rpc.proxy,
  contractId
)
Now to claim the asset using the secret text (pre-image of hash) s, add following code snippet:
var hash: HashFunctions.Hash = HashFunctions.SHA512()
hash.setPreimage(s)
val issuer = <Issuer-party>
val proxu = <CordaRPCOps-instance-created-using-credentials-of-claiming-party>
val res = AssetManager.claimAssetInHTLC(
  proxy,
  contractId,                       // ContractId obtained during lock
  hash,
  AssetContract.Commands.Issue(),   // Contract command for issuing/minting asset
  "com.cordaSimpleApplication.flow.UpdateAssetOwnerFromPointer", // full name of flow to update owner in asset state
  issuer,
  observers                         // Optional parameter for list of observers for this transaction
)
// return value is boolean indicating success or failure of claim
The above function can be adapted to both BondNetwork and TokenNetwork.
If the asset has to be unlocked, use following code snippet:
val issuer = <Issuer-party>
val proxu = <CordaRPCOps-instance-created-using-credentials-of-locking-party>
val res = AssetManager.reclaimAssetInHTLC(
  rpc.proxy,
  contractId,                       // ContractId obtained during lock
  AssetContract.Commands.Issue(),   // Contract command for issuing/minting asset
  issuer,
  observers                         // Optional parameter for list of observers for this transaction
)
// return value is boolean indicating success or failure of claim
For Asset Transfer
TBD
Pre-Configuration Phase
No changes are required in your network's pre-configuration process for Weaver enablement.
Typically, pre-configuration involves:
- Generating node folders for each participating node in the network, which contains CorDapps, certificates, persistence db, etc sub directories. Using Gradle task
net.corda.plugins.Cordformornet.corda.plugins.Dockerform, the folders get created under the directorybuild/nodes(this path is used in above sample code for Identity Service). - The RPC address, username and password specified in above task will be used to create an instance of
CordaRPCOps, which is the first argument for mostweaver-corda-sdkstatic functions as we saw in previous section. For example, one of them isInteroperableHelper.interopFlow:
val response = InteroperableHelper.interopFlow(
    proxy,                                // CordaRPCOps instance to start flows
    viewAddress,
    <trade-finance-relay-url>[:<port>],   // Replace with local network's relay address and port
)
Also, the Corda Driver (which we will setup in the following sections) needs a specific RPC user to be created, so make sure to add that in the Gradle task above, and note the credentials.
- Sample
net.corda.plugins.Dockerformtask:
task prepareDockerNodes(type: net.corda.plugins.Dockerform, dependsOn: ['jar']) {
    def HOST_ADDRESS = "0.0.0.0"
    nodeDefaults {
        projectCordapp {
            deploy = false
        }
    }
    node {
        name "O=Notary,L=London,C=GB"
        notary = [validating : true]
        p2pPort 10004
        rpcSettings {
            address("$HOST_ADDRESS:10003")
            adminAddress("$HOST_ADDRESS:10005")
        }
        cordapps.clear()
    }
    node {
        name "O=PartyA,L=London,C=GB"
        p2pPort 10007
        rpcSettings {
            address("$HOST_ADDRESS:10003")
            adminAddress("$HOST_ADDRESS:10005")
        }
        rpcUsers = [
                [ user: "user1", "password": "test", "permissions": ["ALL"]],
                [ user: "driverUser1", "password": "test", "permissions": ["ALL"]]] // <-- Driver RPC User
    }
    node {
        name "O=PartyB,L=London,C=GB"
        p2pPort 10009
        rpcSettings {
            address("$HOST_ADDRESS:10003")
            adminAddress("$HOST_ADDRESS:10005")
        }
        rpcUsers = [
                [ user: "user1", "password": "test", "permissions": ["ALL"]],
                [ user: "driverUser1", "password": "test", "permissions": ["ALL"]]] // <-- Driver RPC User
    }
}
Startup and Bootstrap Phase
To launch a network using containerized components, you will typically use a Docker Compose or Kubernetes configuration file. No modifications are needed to the node's configurations. Sample instructions are given below for networks launched using Docker Compose; we leave it to the reader to adapt these to their custom launch processes.
For Asset Exchange
The asset exchange mode currently requires only the Interoperation CorDapp module from Weaver. Relays, drivers are not necessary. In the future, we expect to make the asset exchange protocol moe automated using these components; the instructions here will be updated appropriately.
Install Interoperation CorDapp on Nodes
After bootstrapping the nodes folder, copy the following two CorDapps in build/nodes/PartyA/cordapps and build/nodes/PartyB/cordapps folders (PartyA and PartyB node names are for example only):
| Notes |
|---|
| You can follow any installation process for this CorDapp, but make sure it is installed on all the nodes that maintain the states involved in cross-network operations in their vaults. |
For Data Sharing or Asset Transfer
Both the data sharing and asset transfer modes require the Interoperation CorDapp, relays, and drivers, to be deployed.
Install Interoperation CorDapp on Nodes
After bootstrapping the nodes folder, copy the following two CorDapps in build/nodes/PartyA/cordapps and build/nodes/PartyB/cordapps folders (PartyA and PartyB node names are for example only):
| Notes |
|---|
| You can follow any installation process for this CorDapp, but make sure it is installed on all the nodes that maintain the states involved in cross-network operations in their vaults. |
Launch Relay
You need to run one or more relays for network-to-network communication. Here we provide instructions to run one relay running in a Docker container, which is sufficient for data sharing. (Later, we will provide instructions to run multiple relays, which will be useful from a failover perspective.)
Weaver provides a pre-built image for the relay. Before launching a container, you just need to customize its configuration for your Fabric network, which you can do by simply creating a folder (let's call it relay_config) and configuring the following files in it:
.env: This sets suitable environment variables within the relay container. Copy the.env.templatefile from the repository and customize it for your purposes, as indicated in the below sample:PATH_TO_CONFIG=./config.toml
RELAY_NAME=<"name" in config.toml>
RELAY_PORT=<relay-server-port/"port" in config.toml>
EXTERNAL_NETWORK=<docker-bridge-network>
DOCKER_REGISTRY=ghcr.io/hyperledger-labs
DOCKER_IMAGE_NAME=weaver-relay
DOCKER_TAG=1.5.4- The
PATH_TO_CONFIGvariable should point to the properties file typically namedconfig.toml(you can name this whatever you wish). See further below for instructions to write this file. - The
RELAY_NAMEvariable specifies a unique name for this relay. It should match what's specified in theconfig.toml(more on that below). - The
RELAY_PORTvariable specifies the port this relay server will listen on. It should match what's specified in theconfig.toml(more on that below). - The
EXTERNAL_NETWORKvariable should be set to the name of your Fabric network. - The
DOCKER_*variables are used to specify the image on which the container will be built. Make sure you setDOCKER_TAGto the latest version you see on Github.
For more details, see the Relay Docker README ("Relay Server Image" and "Running With Docker Compose" sections).
- The
config.toml: This is the file specified in thePATH_TO_CONFIGvariable in the.env. It specifies properties of this relay and the driver(s) it supports. A sample is given below:name=<relay-name>
port=<relay-port>
host="0.0.0.0"
db_path="db/<relay-name>/requests"
remote_db_path="db/<relay-name>/remote_request"
# FOR TLS
cert_path="credentials/fabric_cert.pem"
key_path="credentials/fabric_key"
tls=<true/false>
[networks]
[networks.<network-name>]
network="<driver-name>"
[relays]
[relays.<foreign-relay-name>]
hostname="<foreign-relay-hostname-or-ip-address>"
port="<foreign-relay-port>"
[drivers]
[drivers.<driver-name>]
hostname="<driver-hostname-or-ip-address>"
port="<driver-port>"<relay-name>should be a unique ID representing this relay; e.g.,my_network_relay. It should match theRELAY_NAMEvalue in.env.<relay-port>is the port number the relay server will listen on. It should match theRELAY_PORTvalue in.env.db_pathandremote_db_pathare used internally by the relay to store data. Replace<relay-name>with the same value set for thenameparameter. (These can point to any filesystem paths in the relay's container.)- If you set
tlstotrue, the relay will enforce TLS communication. Thecert_pathandkey_pathshould point to a Fabric TLS certificate and key respectively, such as those created using thecryptogentool. <network-name>is a unique identifier for your local network. You can set it to whatever value you wish.<driver-name>refers to the driver used by this relay to respond to requests. This also refers to one of the drivers's specifications in thedriverssection further below. In this code snippet, we have defined one driver. (The names in lines 14 and 22 must match.) In lines 23 and 24 respectively, you should specify the hostname and port for the driver (whose configuration we will handle later).- The
relayssection specifies all foreign relays this relay can connect to. The<foreign-relay-name>value should be a unique ID for a given foreign relay, and this value will be used by your Layer-2 applications when constructing view addresses for data sharing requests. In lines 18 and 19, you should specify the hostname and port for the foreign relay. - Enabling TLS:
- You can make your relay accept TLS connections by specifying a TLS certificate file path and private key file path in
cert_pathandkey_pathrespectively, and settlstotrue. - To communicate with a foreign relay using TLS, specify that relay's TLS CA certificate path in
tlsca_cert_path(currently only one certificate can be configured) and settlstotrueby extending that relay's section as follows (Note: this CA certificate should match the one specified in thecert_pathproperty in the foreign relay'sconfig.tomlfile):[relays]
[relays.<foreign-relay-name>]
hostname="<foreign-relay-hostname-or-ip-address>"
port="<foreign-relay-port>"
tls=<true|false>
tlsca_cert_path="<relay-tls-ca-certificate-path>" - To communicate with a driver using TLS, specify the driver's TLS CA certificate in
tlsca_cert_path(currently only one certificate can be configured) and settlstotrueby extending that driver's section as follows (Note: this CA certificate must match the certificate used by the driver using theDRIVER_TLS_CERT_PATHproperty in its.envconfiguration file, which we will examine later):[drivers]
[drivers.<driver-name>]
hostname="<driver-hostname-or-ip-address>"
port="<driver-port>"
tls=<true|false>
tlsca_cert_path="<driver-tls-ca-certificate-path>"
- You can make your relay accept TLS connections by specifying a TLS certificate file path and private key file path in
Notes You can specify more than one foreign relay instance in the relayssection.You can specify more than one driver instance in the driverssection.docker-compose.yaml: This specifies the properties of the relay container. You can use the file in the repository verbatim.
To start the relay server, navigate to the folder containing the above files and run the following:
docker-compose up -d relay-server
Launch Driver
You need to run one or more drivers through which your relay can interact with your Corda network. Here we provide instructions to run one Corda driver running in a Docker container, which is sufficient for data sharing. (Later, we will provide instructions to run multiple drivers, which will be useful both from a failover perspective and to interact with different subsets of your Corda network.)
Weaver provides a pre-built image for the Corda driver. Before launching a container, you just need to customize the container configuration for your Corda network, which you can do by simply configuring the following:
.env: This sets suitable environment variables within the driver container. Copy the.env.templatefile from the repository and customize it for your purposes, as indicated in the below sample:NETWORK_NAME=<container-name-suffix>
DRIVER_PORT=<driver-server-port>
DRIVER_RPC_USERNAME=<driver-rpc-username>
DRIVER_RPC_PASSWORD=<driver-rpc-username>
EXTERNAL_NETWORK=<docker-bridge-network>
DOCKER_IMAGE_NAME=ghcr.io/hyperledger-labs/weaver-corda-driver
DOCKER_TAG=1.2.13
RELAY_TLS=<true|false>
RELAY_TLSCA_TRUST_STORE=<truststore-jks-file-path>
RELAY_TLSCA_TRUST_STORE_PASSWORD=<truststore-jks-file-password>
RELAY_TLSCA_CERT_PATHS=<colon-separated-CA-cert-paths>
DRIVER_TLS=<true|false>
DRIVER_TLS_CERT_PATH=<cert-path>
DRIVER_TLS_KEY_PATH=<private-key-path>NETWORK_NAMEis only used as suffix for container and has no other significance.DRIVER_PORTvariable should be set to the port this driver will listen on.DRIVER_RPC_USERNAMEvariable should be set to rpc user created above for the driver.DRIVER_RPC_PASSWORDvariable should be set to password of above rpc user.EXTERNAL_NETWORKvariable should be set to the name of your Corda network.- Enabling TLS:
- You can make your driver accept TLS connections by specifying
DRIVER_TLSastrueand specifying a TLS certificate file path and private key file path inDRIVER_TLS_CERT_PATHandDRIVER_TLS_KEY_PATHrespectively. The same certificate should be specified in this driver's definition in thedriverssection in theconfig.tomlfile of your relay in thetlsca_cert_pathproperty (see the earlier section on relay configuration). - To communicate with your network' relay using TLS (i.e., if the relay is TLS-enabled), specify that relay's TLS CA certificate path in
RELAY_TLSCA_CERT_PATH(currently only one certificate can be configured) and setRELAY_TLStotrue. This CA certificate should match the one specified in thecert_pathproperty in the relay'sconfig.tomlfile (see the earlier section on relay configuration): - You can point to the folder in your host system containing the certificate and key using the
TLS_CREDENTIALS_DIRvariable. (This folder will be synced to the/corda-driver/credentialsfolder in the Fabric Driver container as specified in the docker-compose file.) Make sure you point to the right certificate and key file paths within the container using theDRIVER_TLS_CERT_PATH,DRIVER_TLS_KEY_PATH, andRELAY_TLSCA_CERT_PATHvariables.
- You can make your driver accept TLS connections by specifying
docker-compose.yaml: This specifies the properties of the driver container. You can use the file in the repository verbatim.
To start the driver, navigate to the folder containing the above files and run the following:
docker-compose up -d
Vault Initialization
To prepare your network for interoperation with a foreign network, you need to record the following to your vault using the Corda SDK (com.weaver.corda.sdk):
Access control policies: Let's take the example of the request made from
trade-finance-networktotrade-logistics-networkfor a B/L earlier in this document.trade-logistics-networkcan have a policy of the following form permitting access to theGetBillOfLadingfunction from a client representing thePartyAnode intrade-finance-networkas follows:{
"securityDomain":"trade-finance-network",
"rules":
[
{
"principal":"<PartyA-certificate-pem>",
"principalType":"certificate",
"resource":"exporternode:10003;carriernode:10003#com.mynetwork.flow.GetBillOfLading:*",
"read":true
}
]
}In this sample, a single rule is specified for requests coming from
trade-finance-network: it states that a workflow call tocom.mynetwork.flow.GetBillOfLadingmade toexporterandcarriernodes of remote Corda network is permitted for a requestor whose certificate is specified in theprincipalattribute. The*at the end indicates that any arguments passed to the function will pass the access control check. Theexporternode:10003andcarriernode:10003are of form<hostname/IP>:<RPC_Port>, forexporterandcarriernodes respectively in the remote Corda network.You need to record this policy rule on your Corda network's vault by invoking either the
AccessControlPolicyManager.createAccessControlPolicyStatefunction or theAccessControlPolicyManager.updateAccessControlPolicyStatefunction on theweaver-corda-sdk; use the former if you are recording a set of rules for the givensecurityDomainfor the first time and the latter to overwrite a set of rules recorded earlier. The above JSON needs to be converted to protobuf object ofcom.weaver.protos.common.access_control.AccessControl.AccessControlPolicy, using google's protobuf library, and the object is the second argument of above functions (first being the instance of CordaRPCOps).Verification policies: Taking the same example as above, an example of a verification policy for a B/L requested by the
trade-finance-networkfrom thetrade-logistics-networkis as follows:{
"securityDomain":"trade-logistics-network",
"identifiers":
[
{
"pattern":"tradelogisticschannel:shipmentcc:GetBillOfLading:*",
"policy":
{
"type":"Signature",
"criteria":
[
"ExporterMSP",
"CarrierMSP"
]
}
}
]
}In this sample, a single verification policy rule is specified for data views coming from
trade-logistics-network: it states that the data returned by theGetBillOfLadingquery made to theshipmentccchaincode on thetradelogisticschannelchannel requires as proof two signatures, one from a peer in the organization whose MSP ID isExporterMSPand another from a peer in the organization whose MSP ID isCarrierMSP.Notes If the remote network is built on Corda, the resource specified in the access control policy can be used here as the pattern, with different node names specified in thecriteria.You need to record this policy rule on your Corda network's vault by invoking Corda sdk's function
VerificationPolicyManager.createVerificationPolicyState(proxy, verificationPolicyProto), whereproxyis an instance ofCordaRPCOpsas described in previous sections, andverificationPolicyProtois an object of protobufcom.weaver.protos.common.verification_policy.VerificationPolicyOuterClass.VerificationPolicy. You can examine the full proto structure here. (Google's protobuf library can be used to convert above JSON to protobuf object.)Notes For any cross-network data request, make sure an access control policy is recorded in the source network ( trade-logistics-networkin the above example) and a corresponding verification policy is recorded in the destination network (trade-finance-networkin the above example) before any relay request is triggered.Foreign network security domain (membership) configuration: Run the following procedure (pseudocode) to record security domain configuration for every foreign network you wish your Corda network to interoperate with (you will need to collect the identity service URLs for all the foreign networks first):
for each foreign network:
    send an HTTP GET request to the network's identity service (using 'curl' or 'wget' from a shell script or equivalent programming language APIs).
    convert the response string to protobuf object of 'com.weaver.protos.common.membership.MembershipOuterClass.Membership'.
    invoke 'MembershipManager.createMembershipState(proxy, membershipProto)' or 'MembershipManager.updateMembershipState(proxy, membershipProto)' on Corda sdk.
As in the above two cases, use
createMembershipStateto record a confiuration for the first time for a givensecurityDomainandupdateMembershipStateto overwrite a configuration.Notes Security domain configurations (organization lists and their certificate chains) for any Fabric/Corda network are subject to change, so you should run the above procedure periodically in a loop.
Your Corda network is now up and running with the necessary Weaver components, and your network's vault is bootstrapped with the initial configuration necessary for cross-network interactions!