Creating applications
After you install smart contracts and deploy your nodes, you can use client applications to transact with other members of your network. Applications can invoke the business logic that is contained in smart contracts to create, transfer, or update assets on the fabric ledger. Use this tutorial to learn how to use client applications to interact with networks that you manage from Fabric Operatons Console.
Target audience: This topic is designed for application developers who are interested in learning more about how to create a client application that interacts with a fabric network.
Overview
Developing an application might require coordination between two distinct users of your network, the network operator and the application developer:
- The network operator is the administrator who uses the Fabric Operatons Console to deploy the nodes of your organization and installs the smart contracts on your network.
- The application developer builds the client application that is consumed by users. The developer uses the Hyperledger Fabric SDKs
 to invoke transactions written in the smart contracts.
If you are the network operator, you will need to complete the following steps before the application developer can interact with your network:
- Use your organization CA to register an application identity.
- Download the connection profile from the organizations panel.
- Send the application developer the following objects and information:
- The enroll ID and secret of the application identity.
- The connection profile.
- The smart contract name.
- The name of the channel the smart contract was deployed on.
If you are the application developer, use the information that is provided by the network operator to complete following steps:
- Generate a certificate and private key by using the enroll ID and secret of the application identity, along with CA endpoint information inside your connection profile.
- Configure a connection by using the Fabric SDK gateway and enable service discovery.
- Use the connection profile, channel name, smart contract name, and application keys to invoke the smart contract.
NOTE: The connection profile that you downloaded from the Fabric Operatons Console can be used to connect to your network by using the Node.js (JavaScript and TypeScript), Java, and Go Fabric SDKs.
The application developer can use two programming models to interact with the network, either the High-Level Programming Model APIs or the Low-Level Fabric SDK APIs.
High-Level Programming Model APIs
Starting with Fabric v1.4, a simplified application and smart contract programming model, known as the fabric-network API, was introduced, and is now the recommended way to develop applications. The new model reduces the number of steps and amount of code that is required to submit a transaction and is supported for applications that are written in Node.js, Java, and Go. The Fabric High-Level Programming Model APIs include the High-level Fabric Gateway SDKs for writing client applications and the High-Level Fabric contract APIs for writing smart contracts. This tutorial focuses on using the High-level Fabric Gateway SDKs.
Fabric Operatons Console recommends and supports the High-level Fabric Gateway SDKs that allow client applications to interact with Fabric Operatons Console networks. These SDKs, available for Node, Java, and Go, allow a client application to invoke smart contracts for the purpose of submitting transactions and evaluating queries. It is recommended that administrative tasks, such as creating channels, deploying smart contracts, are done by using the console, APIs, or Ansible scripts.
IMPORTANT: The SDKs use the concept of a “Gateway” object to represent the connection of a single identity (user) to a fabric network. For performance reasons, applications need to keep a gateway object instance in scope for as long as it is required, and can use it to submit multiple transactions across different smart contracts and network channels. If an application needs to handle multiple user identities, then a separate gateway object instance should be maintained for each identity.
Refer to the SDK documentation for each language for details:
For best practices and examples of how to use the SDKs see the Fabric asset transfer sample ![]()
For information about migrating your applications created using the v1.4 SDK to the 2.x SDK, check out migrating client applications from v1.4 to v2.0 ![]() .
.
NOTE: Client applications can leverage the capabilities of the Go SDK, but currently only the high-level programming model in the gateway package
If you want to take advantage of the High-Level Fabric contract-APIs, you can also use this tutorial to complete the following actions on an Fabric Operatons Console network:
- Generate certificates for your application by using the SDK.
- Invoke a smart contract from the SDK.
- Learn about application development by deploying the commercial paper tutorial to the nodes managed from your console.
Low-Level Fabric SDK APIs**
If you want to continue to use your existing smart contract and application code, or use the other Fabric SDK languages that are provided by the Hyperledger community, you can use the low-level Fabric SDK APIs to connect to your network.
Application connectivity and availability
The Hyperledger Fabric transaction flow ![]() spans multiple components, with the client applications playing a unique role. The SDK submits transaction proposals to the peers for endorsement. It then collects the endorsed proposals to be sent to the ordering service, which then sends blocks of transactions to the peers to be added to channel ledgers. Developers of production applications need to be prepared to manage their interactions between the SDK and their networks for efficiency and availability.
spans multiple components, with the client applications playing a unique role. The SDK submits transaction proposals to the peers for endorsement. It then collects the endorsed proposals to be sent to the ordering service, which then sends blocks of transactions to the peers to be added to channel ledgers. Developers of production applications need to be prepared to manage their interactions between the SDK and their networks for efficiency and availability.
Network considerations
Regardless of whether you choose to use the high-Level Fabric contract APIs, or the low-Level Fabric SDK APIs, both require network access to the following components:
- The CA for your organization. (You should never need to access the CA for another organization).
- All organizations peers (where all organizations are the organizations that are required for endorsing transactions).
- All ordering service nodes for all channels that you are transacting on.
You must ensure that the hostnames of these components are resolvable by DNS lookup (or /etc/hosts if you cannot correctly configure DNS). You must also ensure that all of the network ports for these components are accessible to the systems that are running your applications that are using the Hyperledger Fabric SDKs. The hostname and port for each node are visible in the console. Open the CA, peer, or ordering node tile and then click the Info and usage tab. The API URL field contains the hostname and port for the node.
Application compatibility
For your planning purposes, the following SDK and smart contract compatibility matrices have been tested and validated.
SDKs
Click the Java SDK or Node SDK tab for details.
| Version |Peer Fabric image | Java | |:——–|:——————|:—–| |Java SDK Version 2.2 ![]() | 2.2 | Java 8
| 2.2 | Java 8
Java 11| |Java SDK Version 1.4 ![]() | 1.4 | Java 8
| 1.4 | Java 8
Java 11|
Table 1. Java SDK
| Version |Peer Fabric image | Node | |:——–|:——————|:—–| |Node SDK Version 2.2 ![]() | 2.2 | Node 10 LTS
| 2.2 | Node 10 LTS
Node 12 LTS| |Node SDK Version 1.4 ![]() | 2.2, 1.4 | Node 10 LTS
| 2.2, 1.4 | Node 10 LTS
Node 12 LTS|
Table 2. Node SDK
Smart contracts
Click the Java Smart contract or Node Smart contract tab for details.
| Contract API | Peer Fabric image | Java runtime |
|---|---|---|
| v1.4, v2.2 | v2.2 | Java 11 runtime |
| v1.4, v2.2 | v1.4 | Java 11 runtime |
| Contract API | Peer Fabric image | Node runtime | |:——————-|:—————|:——————–| | v1.4 ![]() , v2.2
, v2.2 ![]() |v2.2 | Node 12 runtime| | v1.4
|v2.2 | Node 12 runtime| | v1.4 ![]() |v1.4| Node 8 runtime |
|v1.4| Node 8 runtime |
Table 3. Node Smart contract
NOTE: Java and Node runtime versions are determined by Fabric Operatons Console peer Fabric image and cannot be changed. These runtimes are different from the default Hyperledger Fabric runtimes.
For more details on smart contract-API compatibility, see:
Registering an application identity
Applications need to sign the transactions they submit to Fabric Operatons Console nodes, and attach a signing certificate that is used by nodes to verify that the transactions are being sent by the proper party. This ensures that transactions are submitted by the organizations that have permission to participate.
The network operator needs to use the organization’s CA to register an application identity, which can then be used by the application developer to generate a certificate and private key. The operator can provide the enroll ID and secret of the identity, along the CA endpoint information, to be used by the SDK to generate certificates. By enrolling on the client side, the application developer ensures that no other party has access to the private key of the application. During registration, the network operator can set an enrollment limit of one for additional security. After the application developer enrolls, the enroll ID and secret cannot be used to generate another private key.
If you are less worried about security, the network operator can enroll an application identity by using the CA tab. The operator can then download the identity or export it to the console wallet. In order to use the certificates from the SDK, you need to convert the keys from base64 into PEM format. You can decode the certs by running the following command on your local system:
export FLAG=$(if [ "$(uname -s)" == "Linux" ]; then echo "-w 0"; else echo "-b 0"; fi)
echo <base64_string> | base64 --decode $FLAG > <key>.pem
Downloading your connection profile
A client application connects to a network via one or more gateway peers. The gateway peers are the peers that are specified in the connection profile, and they are used to perform service discovery to find all of the endorsing peers in the network that will endorse transactions. Service discovery ensures that the request is sent to a peer that is available to process requests.
The Hyperledger Fabric transaction flow ![]() spans multiple components, with the client applications collecting endorsements from peers and sending endorsed transactions to the ordering service. The connection profile provides your application with the endpoints of the peers and ordering nodes that it needs to submit a transaction. It also contains information about your organization, such as your Certificate Authorities and your MSP ID. The Fabric SDKs can read the connection profile directly, without you having to write code that manages the transaction and endorsement flow.
spans multiple components, with the client applications collecting endorsements from peers and sending endorsed transactions to the ordering service. The connection profile provides your application with the endpoints of the peers and ordering nodes that it needs to submit a transaction. It also contains information about your organization, such as your Certificate Authorities and your MSP ID. The Fabric SDKs can read the connection profile directly, without you having to write code that manages the transaction and endorsement flow.
Click the Organization MSP tile for the organization that your client application interacts with. Click Create connection profile to open a side panel where you can build and download your connection profile.
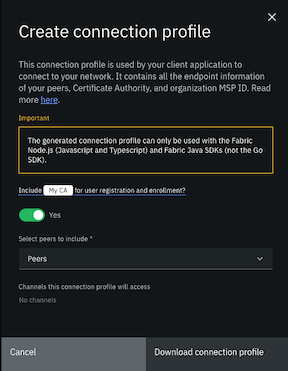
Create connection profile warning panel.
If you plan to use the client application to register and enroll users with the organization CA, you need to include the Certificate Authority in the connection profile definition.
Select the peers to include in the connection profile definition. When a peer is not available to process requests from a client application, service discovery ensures that the request is automatically sent to a different peer. Therefore, to accommodate for peer downtime during a maintenance cycle for example, it is recommended that you select more than one peer for redundancy. In addition to peers created by using the console or APIs, imported peers that have been imported into the console are eligible to be selected as well.
The list of channels that the selected peers have joined is also provided for your information. If a channel is missing from the list, it is likely because the peer joined to it is currently unavailable.
You can then download the connection profile to your local file system and use it with your client application to generate certificates and invoke smart contracts.
NOTE: The connection profile that is downloaded from the Fabric Operatons Console can only be used to connect to your network by using the Node.js (JavaScript and TypeScript) and Java Fabric SDKs.
The generated connection profile only supports Fabric CAs. If you manually built your organization MSP with certificates from an external CA, the connection profile will not include any information in the “certificateAuthorities”: section.
NOTE: You need to ensure that the ports used by the Certificate Authorities, Peers, and Orderers in the connection profile are externally exposed to your client applications.
Service discovery
Service discovery allows your applications to dynamically find the peer and ordering endpoints of your network. If you do not use service discovery, you need to manually add the endpoint information of peer and ordering nodes on your channel to your connection profile or your application. You would need to edit your connection profile or update your application each time a node is added or removed from your network.
Before you can take advantage of the service discovery ![]() feature of Hyperledger Fabric, you must configure anchor peers on the channel. Service discovery allows your application to learn which peers on the channel outside your organization need to endorse a transaction. Without service discovery, you will need to get the endpoint information of these peers out of band from other organizations and add them to your connection profile. For more information, see configuring anchor peers.
feature of Hyperledger Fabric, you must configure anchor peers on the channel. Service discovery allows your application to learn which peers on the channel outside your organization need to endorse a transaction. Without service discovery, you will need to get the endpoint information of these peers out of band from other organizations and add them to your connection profile. For more information, see configuring anchor peers.
Later in this topic, we use the connection profile to build a Fabric gateway that is configured for service discovery.
Enrolling by using the SDK
Once the network operator provides the enroll ID and secret of the application identity and the network connection profile, an application developer can use the Fabric SDKs or the Fabric CA client to generate client-side certificates. You can use the following steps to enroll an application identity by using the Fabric SDK for Node.js ![]() .
.
- Save the connection profile to your local system and rename it
connection.json. -
Save the following code block as
enrollUser.jsin the same directory as your connection profile:'use strict'; const FabricCAServices = require('fabric-ca-client'); const { FileSystemWallet, X509WalletMixin } = require('fabric-network'); const fs = require('fs'); const path = require('path'); const ccpPath = path.resolve(__dirname, 'connection.json'); const ccpJSON = fs.readFileSync(ccpPath, 'utf8'); const ccp = JSON.parse(ccpJSON); async function main() { try { // Create a new CA client for interacting with the CA. const caURL = ccp.certificateAuthorities['<CA_Name>'].url; const ca = new FabricCAServices(caURL); // Create a new file system based wallet for managing identities. const walletPath = path.join(process.cwd(), 'wallet'); const wallet = new FileSystemWallet(walletPath); console.log(`Wallet path: ${walletPath}`); // Check to see if we've already enrolled the admin user. const userExists = await wallet.exists('user1'); if (userExists) { console.log('An identity for "user1" already exists in the wallet'); return; } // Enroll the admin user, and import the new identity into the wallet. const enrollment = await ca.enroll({ enrollmentID: '<app_enroll_id>', enrollmentSecret: '<app_enroll_secret>' }); const identity = X509WalletMixin.createIdentity('<msp_id>', enrollment.certificate, enrollment.key.toBytes()); await wallet.import('user1', identity); console.log('Successfully enrolled client "user1" and imported it into the wallet'); } catch (error) { console.error(`Failed to enroll "user1": ${error}`); process.exit(1); } } main(); - Edit
enrollUser.jsto replace the following values:- Replace
<CA_Name>with the name of your organizations CA. You can find your CA name in the “organizations” section of your connection profile under “Certificate Authorities”. Do not use the “caName” in the “Certificate Authorities” section. - Replace
<app_enroll_id>with the application enroll ID provided by your network operator. - Replace
<app_enroll_secret>with the application enroll secret provided by your network operator. - Replace
<msp_id>with the MSP ID of your organization. You can find your MSP ID under the “organizations” section of your connection profile.
- Replace
- Navigate to
enrollUser.jsusing a terminal and runnode enrollUser.js. If the command runs successfully, you should see the following output:
Successfully enrolled client "user1" and imported it into the wallet
The SDK will create and store your certificates inside the wallet/user1/ directory that is created by the command. This directory is the file system wallet that is used submit future transactions.
The wallets that are used by the Fabric SDKs are different from the wallet in the Fabric Operatons Console. The identities that are stored in your console wallet cannot be directly used by the SDK.
Invoking a smart contract by using the SDK
After you generate the application signing certificate and private key and store them in a wallet, you are ready to submit a transaction. You need to know the name of the smart contract and the name of the channel it was deployed on. You can use the following steps to invoke a smart contract with the Fabric SDK for Node.js ![]() .
.
-
Save the following text on your local machine as
invoke.jsin the same directory asenrollUser.js.'use strict'; const { FileSystemWallet, Gateway } = require('fabric-network'); const fs = require('fs'); const path = require('path'); async function main() { try { // Parse the connection profile. This would be the path to the file downloaded // from the Hyperledger Fabric operational console. const ccpPath = path.resolve(__dirname, 'connection.json'); const ccp = JSON.parse(fs.readFileSync(ccpPath, 'utf8')); // Configure a wallet. This wallet must already be primed with an identity that // the application can use to interact with the peer node. const walletPath = path.resolve(__dirname, 'wallet'); const wallet = new FileSystemWallet(walletPath); // Create a new gateway, and connect to the gateway peer node(s). The identity // specified must already exist in the specified wallet. const gateway = new Gateway(); await gateway.connect(ccp, { wallet, identity: 'user1' , discovery: {enabled: true, asLocalhost:false }}); // Get the network channel that the smart contract is deployed to. const network = await gateway.getNetwork('<channel_name>'); // Get the smart contract from the network channel. const contract = network.getContract('<smart_contract_name>'); // Submit the 'createCar' transaction to the smart contract, and wait for it // to be committed to the ledger. await contract.submitTransaction('createCar', 'CAR12', 'Honda', 'Accord', 'Black', 'Tom'); console.log('Transaction has been submitted'); await gateway.disconnect(); } catch (error) { console.error(`Failed to submit transaction: ${error}`); process.exit(1); } } main(); - Edit
invoke.jsto replace the following values:- Replace
<channel_name>with the name of the channel the smart contract was deployed on. You can find your CA name under the “Certificate Authorities” section of your connection profile. - Replace
<smart_contract_name>with the name of the installed smart contract. You can get this value from your network operator. - Edit the contents of
submitTransactionto invoke a function inside your smart contract. Theinvoke.jsfile is written to invoke the FabCar smart contract. If you want to run the following file to submit a transaction, install FabCar and instantiate the smart contract on one of your channels.
- Replace
- Navigate to
invoke.jsusing a terminal and runnode invoke.js. If the command runs successfully, you should see the following output:
Transaction has been submitted
If you navigate to your channel by using the console, you are able to see that another block was added by the transaction.
NOTE: Your transaction might fail if you did not configure an anchor peer on your channel. Unless you manually updated your connection profile, your application needs to use the service discovery
Running the Commercial Paper sample
The commercial paper tutorial ![]() in the Hyperledger Fabric documentation takes developers through a use case in which multiple parties buy, sell, and redeem commercial paper. It extends the developing applications topic
in the Hyperledger Fabric documentation takes developers through a use case in which multiple parties buy, sell, and redeem commercial paper. It extends the developing applications topic ![]() by providing sample smart contract and application code that allows you to create and trade assets on a local instance of Fabric.
by providing sample smart contract and application code that allows you to create and trade assets on a local instance of Fabric.
You can also deploy the commercial paper tutorial sample code onto an Fabric Operatons Console network. This allows you to quickly get started interacting with your network and use the sample to download the necessary dependencies. The sample code also includes examples of how you can import certificates into a wallet ![]() and use your connection profile to build a Fabric gateway
and use your connection profile to build a Fabric gateway ![]() . The tutorial can be used by two different organizations to complete different transactions with a single asset. If you used the build a network tutorial to deploy two peer organizations that are connected to a channel, you can interact with the tutorial by using both organizations.
. The tutorial can be used by two different organizations to complete different transactions with a single asset. If you used the build a network tutorial to deploy two peer organizations that are connected to a channel, you can interact with the tutorial by using both organizations.
Use the following steps to deploy the sample on your network. You can review the tutorial in the Fabric Documentation commercial paper tutorial ![]() for more details about the smart contracts and the application structure.
for more details about the smart contracts and the application structure.
Prerequisites
Before you can deploy the commercial paper sample, you need to install required tools on your local machine:
You will also need a use text editor to edit and save files in the sample. You can use many of the high-quality editors that are available for free, such as Visual Studio Code ![]() , Atom
, Atom ![]() , Sublime text
, Sublime text ![]() , or Brackets
, or Brackets ![]() .
.
Step one: Download the sample
You download the commercial paper sample by cloning the Fabric samples repository ![]() :
:
git clone https://github.com/hyperledger/fabric-samples.git
After you download the Fabric Samples, run the following commands to ensure that you are using the version of the samples compatible with Fabric v1.4.11 and v2.2.2.
cd fabric-samples
git checkout v1.4.9
You can find the sample in the commercial paper folder of fabric-samples.
cd $HOME/fabric-samples/commercial-paper
The tutorial contains two sample organizations, magnetocorp and digibank. Each organization has its own sample application code, which is stored in two separate folders under the organization directory.
ls organization
digibank	magnetocorp
In the course of the tutorial, you will first use the magnetocorp application code to issue a commercial paper. You can then use the digibank application code to buy and redeem the paper. Both directories contain the same smart contract.
Navigate to the application code inside the magnetocorp directory.
cd organization/magnetocorp/application
When you are inside the directory, you can download the application dependencies by running the following command:
npm install
Step two: Install and Propose smart contract
You can find the commercial paper smart contract inside the contract folder of the digibank and magnetocorp directory. You need to install this smart contract on all the peers of the organizations that use the tutorial.
Smart contracts running on peers using a Fabric v2.x image must be packed using the .tar.gz format ![]() . These smart contracts must be installed and proposed by you, then approved by other channel members before being committed on the channel. For information on using smart contracts with Fabric v2.x peers, check out deploying a smart contract using Fabric 2.x.
. These smart contracts must be installed and proposed by you, then approved by other channel members before being committed on the channel. For information on using smart contracts with Fabric v2.x peers, check out deploying a smart contract using Fabric 2.x.
Step three: Generate certificates for your wallet
Applications need to sign the requests they send to Fabric components. If the components do not recognize the organizations submitting the transactions, the transactions are rejected and return with an error. The commercial paper sample creates a file system wallet that stores your certificates and signs your transactions. For more information about how applications use wallets, see the wallet ![]() topic in the Fabric Documentation. The wallets that are used by the Fabric SDKs are different from the wallet in the Fabric Operatons Console. The identities that are stored in your console wallet cannot be directly used by the SDK.
topic in the Fabric Documentation. The wallets that are used by the Fabric SDKs are different from the wallet in the Fabric Operatons Console. The identities that are stored in your console wallet cannot be directly used by the SDK.
The original sample uses the addToWallet.js file to create a file system wallet using certificates from the fabric samples folder. We are going to create a new file that uses the SDK to generate a client-side certificate and store them directly inside a new wallet.
Choose the CA of the organization you want to use to operate the tutorial as magnetocorp. For example, you can use Org1 if you have completed the Build a network tutorial. Use the CA to create an application identity. Save the enroll ID and secret.
Use your console to download your connection profile. Save the connection profile to your local file system and rename it connection.json. Then, issue the following command from the magnetocorp/application directory to move the connection profile to a directory where it will be referenced by future commands.
mv $HOME/<path_to_creds>/connection.json ../gateway/connection.json
Save the following code block as enrollUser.js in the /magnetocorp/application directory:
  'use strict';

  const FabricCAServices = require('fabric-ca-client');
  const { FileSystemWallet, X509WalletMixin } = require('fabric-network');
  const fs = require('fs');
  const path = require('path');

  const ccpPath = path.resolve(__dirname, '../gateway/connection.json');
  const ccpJSON = fs.readFileSync(ccpPath, 'utf8');
  const ccp = JSON.parse(ccpJSON);

  async function main() {
    try {

      // Create a new CA client for interacting with the CA.
      const caURL = ccp.certificateAuthorities['<CA_Name>'].url;
      const ca = new FabricCAServices(caURL);

      // Create a new file system based wallet for managing identities.
      const wallet = new FileSystemWallet('../identity/user/isabella/wallet');

      // Check to see if we've already enrolled the admin user.
      const userExists = await wallet.exists('user1');
      if (userExists) {
        console.log('An identity for "user1" already exists in the wallet');
        return;
      }

      // Enroll the admin user, and import the new identity into the wallet.
      const enrollment = await ca.enroll({ enrollmentID: '<app_enroll_id>', enrollmentSecret: '<app_enroll_secret>' });
      const identity = X509WalletMixin.createIdentity('<msp_id>', enrollment.certificate, enrollment.key.toBytes());
      await wallet.import('user1', identity);
      console.log('Successfully enrolled client "user1" and imported it into the wallet');

      } catch (error) {
        console.error(`Failed to enroll "user1": ${error}`);
        process.exit(1);
      }
  }
  main();
Take a moment to study how this file works before we edit it. First, enrollUser.js imports the FileSystemWallet and X509WalletMixin classes from the fabric-network library.
const FabricCAServices = require('fabric-ca-client');
const { FileSystemWallet, X509WalletMixin } = require('fabric-network');
The file then uses the FileSystemWallet class to build a wallet on your local filesystem. You can edit the following line to store the wallet in a different location.
const wallet = new FileSystemWallet('../identity/user/isabella/wallet')
After you create the wallet, the code snippet uses the enroll ID and secret to enroll by using your organization CA. It then creates an identity for the signing certificate and private key and imports them into the wallet. Notice how the file passes your organization MSP ID into the wallet as well.
// Enroll the admin user, and import the new identity into the wallet.
const enrollment = await ca.enroll({ enrollmentID: '<app_enroll_id>', enrollmentSecret: '<app_enroll_secret>' });
const identity = X509WalletMixin.createIdentity('<msp_id>', enrollment.certificate, enrollment.key.toBytes());
wallet.import('user1', identity);
console.log('Successfully enrolled client "user1" and imported it into the wallet');
Edit enrollUser.js to replace the following values:
- Replace
<CA_Name>with the name of your organization’s CA. You can find your CA name in the “organizations” section of your connection profile under “Certificate Authorities”. Do not use the “caName” in the “Certificate Authorities” section. - Replace
<app_enroll_id>with the application enroll ID provided by your network operator. - Replace
<app_enroll_secret>with the application enroll secret provided by your network operator. - Replace
<msp_id>with the MSP ID of your organization. You can find this MSP ID under the “organizations” section of your connection profile.
Save enrollUser.js and close it. In the magnetocorp directory, run the following command:
node enrollUser.js
When the command completes successfully, you should see the following output:
Successfully enrolled client "user1" and imported it into the wallet
You can find the wallet that was created in the identity folder of the magnetocorp directory.
Step four: Use the connection profile to build a Fabric gateway
The Hyperledger Fabric transaction flow ![]() spans multiple components, with the client applications playing a unique role. Your application needs to connect to the peers that need to endorse the transaction and needs to connect to the ordering service that will order the transaction and add it into a block. You can provide the endpoints of these nodes to your application by using your connection profile to construct a Fabric gateway. The gateway then conducts the low-level interactions with your Fabric network. To learn more, visit the Fabric gateway
spans multiple components, with the client applications playing a unique role. Your application needs to connect to the peers that need to endorse the transaction and needs to connect to the ordering service that will order the transaction and add it into a block. You can provide the endpoints of these nodes to your application by using your connection profile to construct a Fabric gateway. The gateway then conducts the low-level interactions with your Fabric network. To learn more, visit the Fabric gateway ![]() topic in the Fabric documentation.
topic in the Fabric documentation.
You have already downloaded your connection profile and used it to connect to your organization’s Certificate Authority. Now we use the connection profile to build a gateway.
Open the file issue.js in a text editor. Before you edit the file, notice that it imports the FileSystemWallet and Gateway classes from fabric-network library.
const { FileSystemWallet, Gateway } = require('fabric-network')
You will need to import the path class to build the gateway from the connection profile you downloaded from your console. Add the following line to the file to import the path class:
const path = require('path');
The Gateway class is used to construct a gateway that you will use to submit your transaction.
const gateway = new Gateway()
The FileSystemWallet class is used to load the wallet you created in the previous step. Edit the following line if you changed the location of the wallet on your file system.
const wallet = new FileSystemWallet('../identity/user/isabella/wallet');
After you import your wallet, use the following code to pass your connection profile and wallet to the new gateway. You need to make the following Edits to the code so it resembles the code snippet below. The lines that print logs have been removed for brevity.
- Update the
userNameto match the value that you selected for youridentityLabelinenrollUser.js. - Update the discovery options to take advantage of service discovery on your network. Set
discovery: { enabled: true, asLocalhost: false, strategy: DefaultQueryHandlerStrategies.MSPID_SCOPE_ROUND_ROBIN }. - Update the section importing your connection profile. The console connection profile is in JSON format rather than a YAML file used by the sample.
const userName = 'user1';

// Load connection profile; will be used to locate a gateway
const ccpPath = path.resolve(__dirname, '../gateway/connection.json');
const ccpJSON = fs.readFileSync(ccpPath, 'utf8');
const connectionProfile = JSON.parse(ccpJSON);

// Set connection options; identity and wallet
let connectionOptions = {
  identity: userName,
  wallet: wallet,
  discovery: { enabled: true, asLocalhost: false, strategy: DefaultQueryHandlerStrategies.MSPID_SCOPE_ROUND_ROBIN }
};

await gateway.connect(connectionProfile, connectionOptions);
This code snippet uses the gateway to open gRPC connections to the peer and orderer nodes, and interact with your network.
Enabling service discovery
Fabric service discovery ![]() allows your applications to dynamically find the peer and ordering endpoints of your network and the peers on the channel outside your organization that need to endorse a transaction. If you do not configure service discovery, the endpoint information of peer and ordering nodes on your channel needs to be added manually to your connection profile or your application. You would need to edit your connection profile or update your application each time a node is added or removed from your network.
allows your applications to dynamically find the peer and ordering endpoints of your network and the peers on the channel outside your organization that need to endorse a transaction. If you do not configure service discovery, the endpoint information of peer and ordering nodes on your channel needs to be added manually to your connection profile or your application. You would need to edit your connection profile or update your application each time a node is added or removed from your network.
To configure a client application to use service discovery, set the following options on the gateway.connect() call by defining connectionOptions that include:
discovery: { enabled: true, asLocalhost: false, strategy: DefaultQueryHandlerStrategies.MSPID_SCOPE_ROUND_ROBIN }
Setting strategy: DefaultQueryHandlerStrategies.MSPID_SCOPE_ROUND_ROBIN ensures that requests from the client application are distributed across available peers. See DefaultQueryHandlerStrategies ![]() in the Node SDK documentation for more information.
in the Node SDK documentation for more information.
Step five: Invoke the smart contract
After you configure the gateway to connect to the network managed by your console, we will edit the portion of the issue.js file that connects to the commercial paper smart contract. You need to provide the gateway the contract name and the channel where the smart contract was deployed.
Edit the following line, and replace mychannel with your channel name.
const network = await gateway.getNetwork('mychannel');
Following a line of code that prints a message to your console, you can find a line that provides the gateway the smart contract name. Edit the following line to change the name papercontract to the name of the contract you installed.
const contract = await network.getContract('papercontract', 'org.papernet.commercialpaper');
The gateway now has all the information that it needs to submit a transaction. The following line invokes the issue function in the commercial paper contract, with the arguments defining the new commercial paper asset.
const issueResponse = await contract.submitTransaction('issue', 'MagnetoCorp', '00001', '2020-05-31', '2020-11-30', '5000000');
After it submits the transaction using the gateway, the issue.js file disconnects the gateway connection.
gateway.disconnect();
This command closes the gRPC connections opened by your gateway. Closing connections save network resources and improve performance.
After completing the edits from this step and Step four, save issue.js and close it. Submit the transaction that creates the new commercial paper by using the following command:
node issue.js
If the transaction is successful, you can see the following output in your terminal:
Transaction complete.
Disconnect from Fabric gateway.
Issue program complete.
Step six: Operate the sample as Digibank
After you create the commercial paper by operating as Magnetocorp, you can buy and redeem the commercial paper by operating the tutorial as Digibank. You can use the Digibank application code by using the same organization as Magnetocorp, or use the CA, peers, and connection profile of a different organization. If you competed the join a network tutorial, this is a good opportunity operate the tutorial as Org2.
Go to the digibank/application directory. You can follow the directions that are provided in Step three to create to generate the certificates and wallet that will sign the transaction as Digibank. You can then use the buy.js file to purchase the commercial paper from Magnetocorp, and then use redeem.js to redeem the paper. You can follow Step four and Step five to edit those files so that they point to the correct connection profile, channel and smart contract.
Connecting to your network by using low-level Fabric SDK APIs
If you are interested in preserving your existing application code, or by using Fabric SDKs for languages other than Node.js, you can still connect to your network by using lower-level Fabric SDK APIs. Use the console to download your connection profile. You can then import the endpoints of the peers and ordering nodes of your channel directly from the connection profile, or use the node endpoint information to manually add peer and orderer objects. You will also need to use your CA to create an application identity, and then use the CA endpoint information enroll on the client side, or generate certificates using your console.
The Fabric Node SDK ![]() documentation provides a tutorial on how to connect to your network using a connection profile
documentation provides a tutorial on how to connect to your network using a connection profile ![]() ß. The tutorial uses the CA endpoint information in your connection profile to generate keys using the SDK. You can also use your console to generate a signing certificate and private key and convert the keys into PEM format. You can then set a user context by passing your keys directly to the SDKs’ Fabric Client class
ß. The tutorial uses the CA endpoint information in your connection profile to generate keys using the SDK. You can also use your console to generate a signing certificate and private key and convert the keys into PEM format. You can then set a user context by passing your keys directly to the SDKs’ Fabric Client class ![]() using the following code:
using the following code:
fabric_client.createUser({
		username: 'admin',
		mspid:  'org1',
		cryptoContent: {
			privateKeyPEM: fs.readFileSync(path.join(__dirname,'./privateKey.pem')),
			signedCertPEM: fs.readFileSync(path.join(__dirname,'./certificate.pem'))
		}});
If you are using low-level SDK APIs to connect to your network, there are additional steps that you can take to manage the performance and availability of your application.
Highly available applications
As a high availability best practice, it is strongly recommended that you deploy a minimum of two peers per organization for failover. You need to adapt your applications for high availability as well by downloading a connection profile and enabling service discovery. Install smart contracts on both peers and join the peers to your channels.
Using indexes with CouchDB
If you use CouchDB as your state database, you can perform JSON data queries from your smart contract against the channel’s state data. It is strongly recommended that you create indexes for your JSON queries and use them in your smart contract. Indexes allow your applications to retrieve data efficiently when your network adds additional blocks of transactions and entries in the world state.
For more information about CouchDB and how to set up indexes, see CouchDB as the State Database ![]() in the Hyperledger Fabric documentation. You can also find an example that uses an index with chaincode in the Fabric CouchDB tutorial
in the Hyperledger Fabric documentation. You can also find an example that uses an index with chaincode in the Fabric CouchDB tutorial ![]() .
.
Avoid using chaincode for queries that will result in a scan of the entire CouchDB database. Full length database scans result in long response times and will degrade the performance of your network. You can take some of the following steps to avoid and manage large queries:
- Set up indexes with your chaincode.
- All fields in the index must also be in the selector or sort sections of your query for the index to be used.
- More complex queries will have a lower performance and will be less likely to use an index.
- You should try to avoid operators that will result in a full table scan or a full index scan, such as
$or,$in, and$regex.
You can find examples that demonstrate how queries use indexes and what type of queries will have the best performance in the Fabric CouchDB tutorial ![]() .
.
Peers on the Fabric Operatons Console have a set queryLimit, and will only return 10,000 entries from the state database. If your query reaches the queryLimit, you can use multiple queries to get the remaining results. If you need more results from a range query, start subsequent queries with the last key that is returned by the previous query. If you need more results from JSON queries, sort your query by using one of the variables in your data, then use the last value from the previous query in a ‘greater than’ filter for the next query.
Do not query the entire database for the purpose of aggregation or reporting. If you want to build a dashboard or collect large amounts of data as part of your application, you can query an off chain database that replicates the data from your fabric network. This allows you to understand the data on the fabric without degrading the performance of your network or disrupting transactions.
You can use block or chaincode events from your application to write transaction data to an off-chain database or analytics engine. For each block received, the block listener application would iterate through the block transactions and build a data store by using the key/value writes from each valid transaction’s rwset. The Peer channel-based event services ![]() provide replayable events to ensure the integrity of downstream data stores. For an example of how you can use an event listener to write data to an external database, see the off chain data sample
provide replayable events to ensure the integrity of downstream data stores. For an example of how you can use an event listener to write data to an external database, see the off chain data sample ![]() in the Fabric Samples.
in the Fabric Samples.